Connection Settings
Prerequisites
Data Pull is part of ItemPath's middleware functionality.
It is an app that allows you to configure an integration with another system to "pull" data to create or delete records in Power Pick. The typical use case is through a REST API connection with your enterprise resource planning (ERP) software to retrieve and generate orders and materials in Power Pick.
Before carrying out any steps with Data Pull, you should have a plan in place for how these records will be created and identified in your ERP and know how to find and authorize the connection.
Since Data Pull will attempt to create orders, you will need to ensure that the Materials in the Order Lines are actually stored in your Kardex VLM system. Typically, a location or bin field in your ERP with the value "Kardex" will suffice.
Finally, you will want to have planned for a way to identify new orders. We suggest either of the following:
- Date Range: If there is a field like “creation date” or “date updated,” these can be used to look for recent records. By adding a {lastDay} or {lastWeek} variable to your endpoint or query, you can pull data from within that recent range. You’ll just need to set the time format (e.g. “YYYY-MM-DD HH:MM:SS.SSSZ”) so the integration knows how to convert it.
- Status Field: Using a status is another way to indicate what records should be pulled. For example, if using an OData endpoint, you might have a filter like $filter=ORDER_STATUS eq ‘Ready to Import'. You’ll then want to update that status in the confirmation step.
Set up the connection
To set up your Data Pull app, you will need to first add the connection in your ItemPath site’s Settings. This is the same for both Data Pull and Data Push, so steps in the above video will apply here as well.
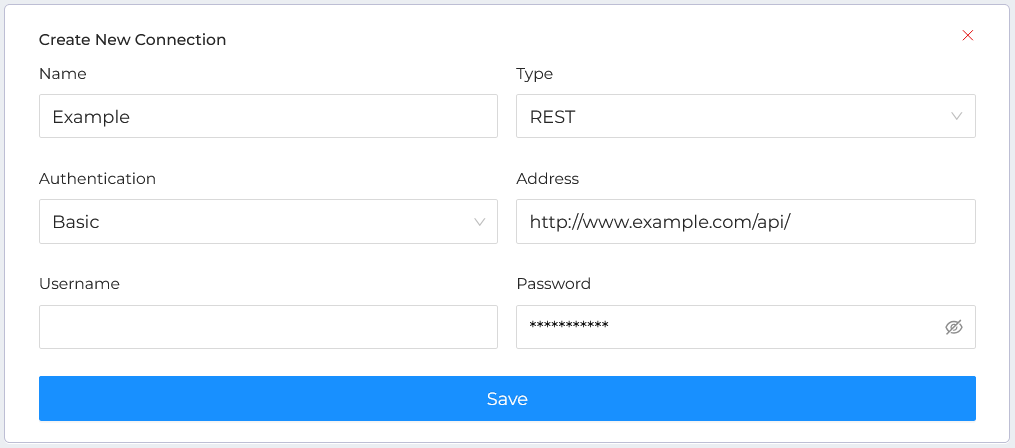
In the Connections tab, click the “+” button to start a new connection and follow these steps:
- Give the connection a Name you choose.
- Set the Type to your software, or "API" for most connections.
- Choose an Authentication Type.
- For many API connections, a "No Auth" connection type will be used and tokens will be passed in the header, or a "Basic" connection type will allow a username and password. Other available connection types (NetSuite, SQL, etc.) will open or close additional authentication fields.
- Enter the base Address of the API call. (The path will be configured later when creating an integration.)
- Save to open next steps.
Once these settings are saved, you'll be able to set the test endpoint (usually /ping.) You can also enter headers that will be sent for all API calls. For authentication keys, we recommend checking the Private box to indicate confidentiality. Those keys won't show in up any logs.
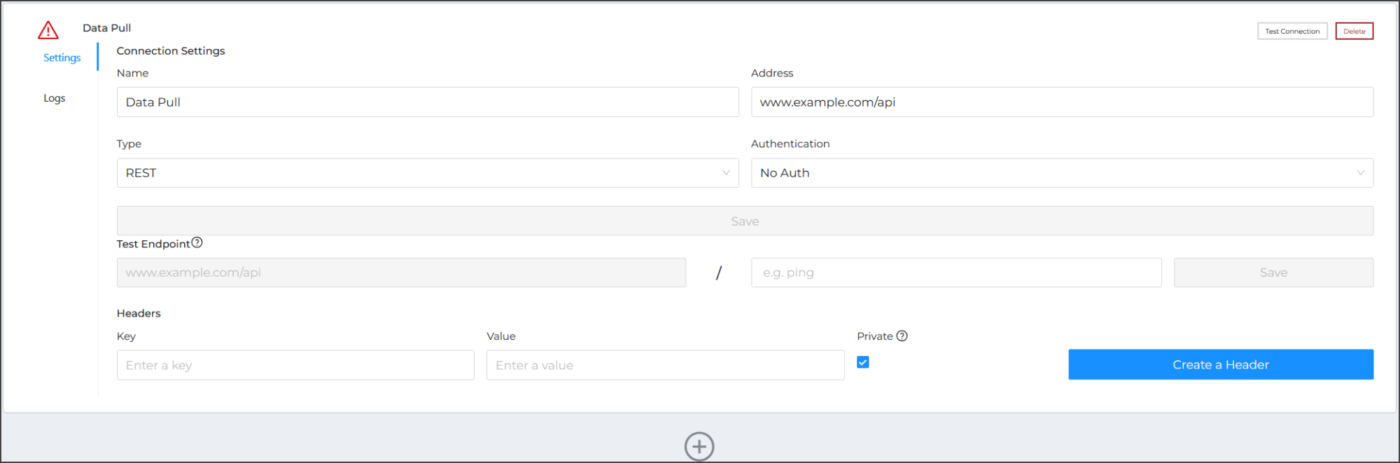
Test the connection and check for a green check mark confirmation.
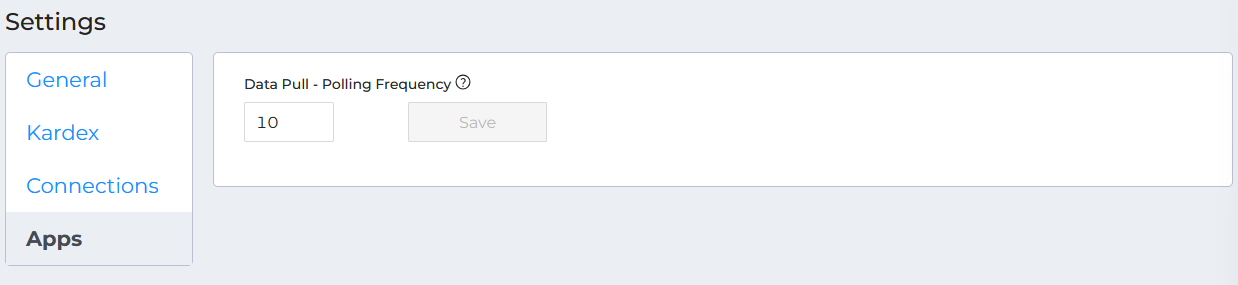
Adjust the polling frequency
The polling frequency is the interval at which Data Pull will check the connection service for data. The default polling frequency is 10s, but you can increase or reduce the frequency to meet your needs.
To adjust the polling frequency:
- Select Settings > Apps > Data Pull
- Adjust the value.
- Save.