


Configure an Order Builder Integration
While orders can be created directly in Power Pick - or sent from an external system via the ItemPath API or Data Pull - Order Builder allows you to generate those orders directly within ItemPath. This gives you complete control over order creation through an easy-to-use UI, bridging the gap between your raw data and your warehouse floor. Whether you need to trigger orders automatically based on inventory reports or provide managers with a streamlined manual request form, Order Builder centralizes the process without requiring deep technical knowledge of Power Pick.
An Order Builder integration acts as a set of rules for creating orders directly within ItemPath.
Creating a New Integration
- Navigate to Apps > Order Builder.
- Select New Integration.
- Name: Provide a unique, descriptive name for the integration.
- Type of Order Builder Creation: Select either Automatic or Manual.
- Click Create Integration.

Once the integration is created, your landing tab will depend on the type you selected:
- Automatic: You will be redirected to the Settings tab to begin mapping your report fields.
- Manual: You will be redirected to the Builder tab, which serves as the manual request form for creating orders once configuration is complete.
Automatic Integrations
Automatic integrations have two tabs: Settings and Orders.
The Settings Tab
The Settings tab is divided into four key sections:
General Settings:
- Integration Name: This is defined when the integration is created, but can be edited as needed.
- Type of Order Builder Creation: This is defined when the integration is created and cannot be edited.
- Type of Order to Create: Choose Pick, Put, Count or Replenishment
- Report to Build Orders From: Select the report that will provide the data for this integration.
- Creation Mode:
- Line: The report will generate a single Order where each report row becomes an Order Line.
- Order: Each report row will generate its own individual Order with a single Order Line.
- Internal Name Mapping: Create a format for unique internal order names by concatenating values such as the current date/time, the order type, and even custom text.
- Auto-Send Orders: When selected, orders are sent directly to Power Pick. This is selected by default and can only be de-selected once custom statuses have been created.

Order Fields & Order Lines:
These sections define how report data maps to Power Pick. The following mandatory fields are pre-selected and cannot be removed:
- Order Fields: Order Name
- Order Lines:
- Material Name
- Quantity
You'll need to map these mandatory fields in order to use the integration.
Difference between Internal Name Mapping Order Name
While the Internal Name Mapping is used for tracking within ItemPath, the Order Name is what will actually appear in the Power Pick interface for warehouse operators. You can create a format for each name by concatenating values such as report columns, the order type, and custom text.
These two values can match, but they do not have to.
To configure or add fields:
- Select a field from the Add Field dropdown and click Add. (Skip to step 2 to configure one of the mandatory fields)
- Select a mapping type:
- Static Text: A fixed value for every order.
- Report Column: Maps directly to a column in the source report.
- Advanced: Concatenate multiple report columns and static text into one string.
- Optional: Set as Required or View Only.
- Save.
Order Builder - Custom Statuses:
Define tracking labels specific to this integration. See Add Custom Statuses for Order Builder for detailed instructions.
Manual Integrations
Manual integrations have three tabs: Builder, Settings, and Orders. While the Builder tab is the default tab when you open an integration, you'll need to configure the Settings before the integration is ready for use.
The Settings Tab
Use this tab to define the structure and requirements of the form your team will see on the Builder tab.
Integration Settings:
- Integration Name: This is defined when the integration is created, but can be edited as needed.
- Type of Order Builder Creation: This is defined when the integration is created and cannot be edited.
Generic Settings:
- Material Fields: Choose which fields (e.g., Current Quantity, Material Property, Info1) are visible in the Material Lookup section of the Builder tab.
- Hide Revisions: If checked, the Revisions component at the bottom of the Builder tab will be hidden.

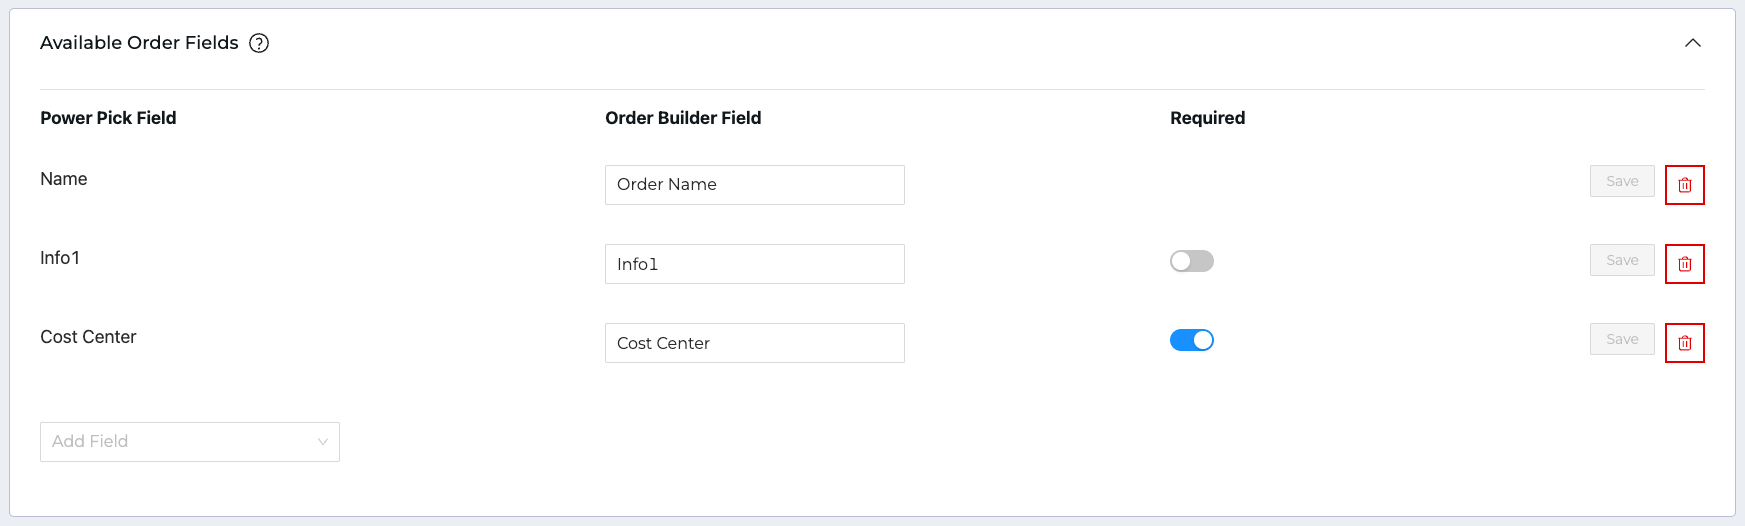
Available Order Fields & Order Line Fields:
This is where you'll configure which fields appear on the form for creating orders.
- Select a field from the Add Field dropdown and click Add.
- Order Builder Field: Define a custom label to make the field name more intuitive for floor staff.
- Optional: Mark fields as Required to ensure users provide the necessary data before they can add an Order Line or create an Order.
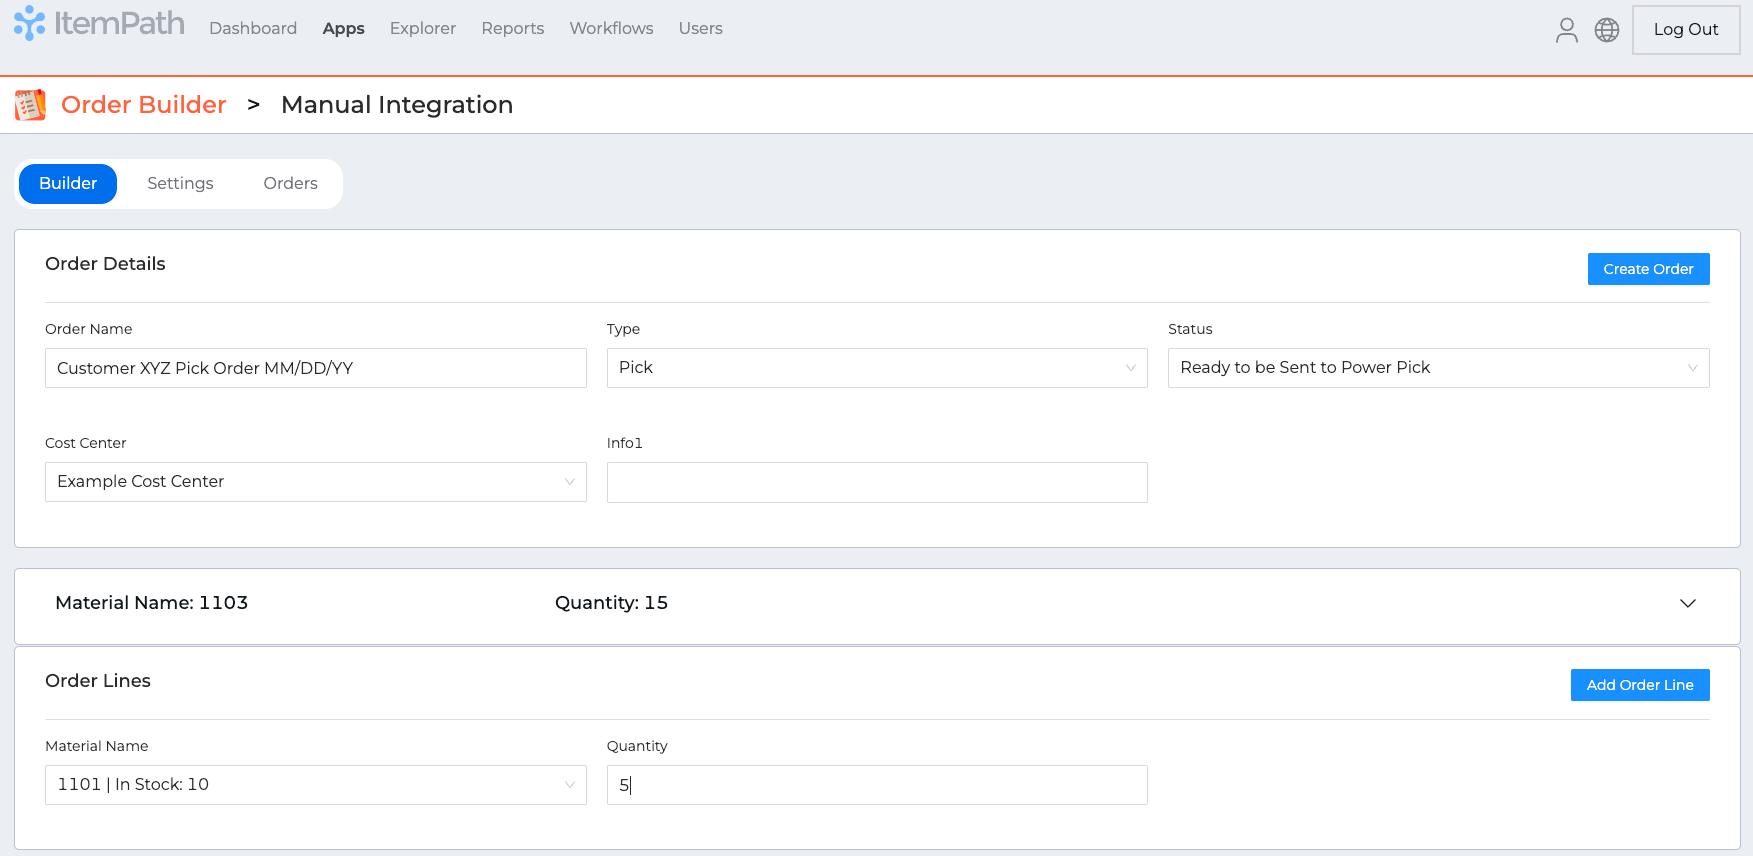
The Builder Tab
The Builder tab is the primary workspace for creating orders. It's divided into three sections:
Order Details:
- Enter the Order Name.
- Select the Type: Pick, Put, Replenishment, or Count.
- Select the Status: Ready for Power Pick, or a custom status.
Order Lines:
- Search for and select a Material.
- Specify the Quantity.
- Fill out any additional fields (as defined on the Settings tab).
- Click Add Order Line.
Material Lookup:
Use this component to search for materials and verify details (like stock levels, current quantity and more) before adding them to an order. This is useful for confirming you are adding the correct materials to the order. The details displayed here are defined on the Settings tab.

The Orders Tab
The Orders tab is used for monitoring and managing orders created using an integration. It is available for both automatic and manual integrations.
- Search: Use the search field to find orders by name.
- Filter by Status: Narrow the list down to orders that match 1 or more statuses.
- Update Selected Status: Select orders in the list by clicking on the circle to the left of a row, select a status from the Update Selected Status dropdown and click Update to change the status for all selected orders.
- Delete: Select orders in the list by clicking on the circle to the left of a row, and click Delete to permanently delete the order.
Once an order is successfully created in Power Pick, it can no longer be edited and will appear as greyed out in the list.
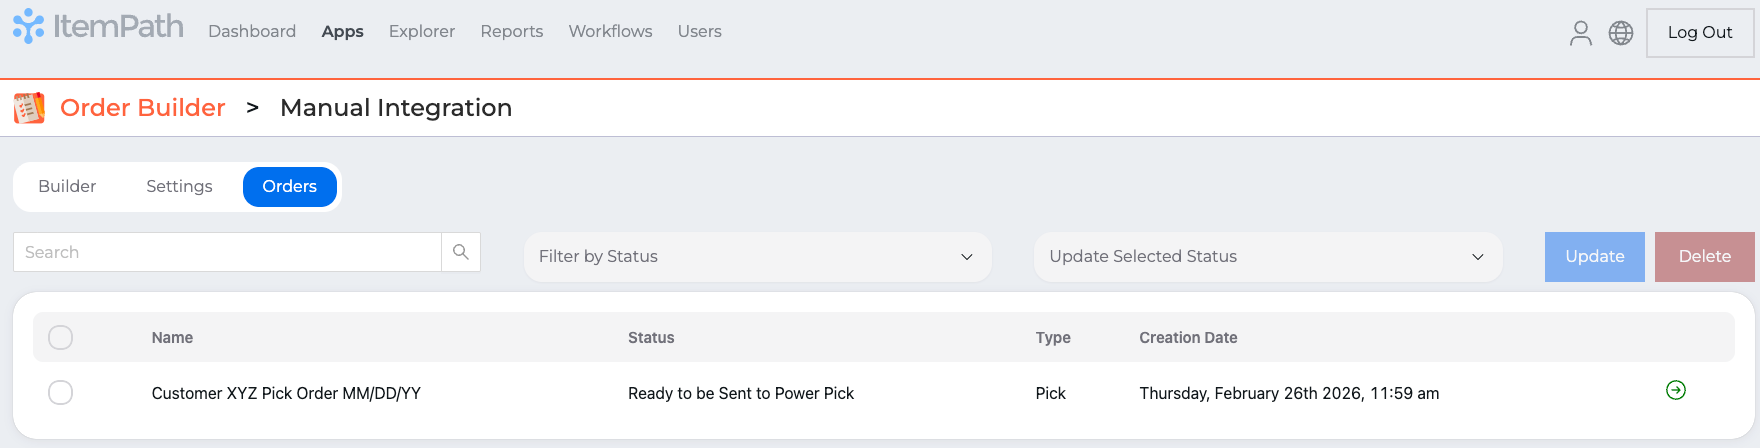
View Order Details
Click the green arrow on the far right of a row to display order details, a list of order lines, and revisions.
The Revisions table displays when an order is created and any updates to it thereafter. This can be hidden for manual integrations by selecting Hide Revisions in the Generic Settings.
Next Steps
For Automatic Integrations: You can now activate your integration and create a workflow to automatically trigger it to run.
For Manual Integrations: You are ready to begin using the Builder tab to generate orders!