Mappings and Confirmations for Data Pull
Data Pull creates and runs integrations that transfer data from external services (such as your enterprise resource planning system) to Power Pick. To successfully populate Power Pick with data, you must create a mapping: a set of instructions that tell Data Pull how to translate and transfer information from the connected service to the appropriate fields within Power Pick.
For example, Data Pull can retrieve requests for parts from your enterprise resource planning (ERP) system and create orders in Power Pick. Power Pick will prompt warehouse staff to fulfill the order. The mapping tells Data Pull how to fill in the information so that Power Pick knows the material, the quantity of that material, and the deadline for fulfillment for that order.
Think of Data Pull’s mapping tab as a guide for interpreting the data returned in a request (typically JSON) from a source system, saving instructions for how to use those values to fill in data for orders or materials as needed. This is an essential part of creating an integration: without a mapping, Data Pull can't create or delete data!
If you’re not familiar with JSON, here’s a short primer:
JSON stands for JavaScript Object Notation, a common data format that many programming languages can easily interpret. For example, many application programming interfaces (APIs) commonly respond to requests with a JSON body. A pair of braces,
{}, denotes a JSON object.key: valuepairs represent individual properties of an object, with commas separating pairs within a JSON string. Values can be strings, numbers, boolean values, lists, or JSON objects.Square brackets
[]denote lists, with commas separating objects in the list. The ItemPath API documentation provides sample JSON responses if you are curious to see how this looks in practice. There are also examples of JSON later in this article!
Remember that Data Pull has four integration types:
- Create orders
- Delete orders
- Create materials
- Delete materials
Depending on the integration type, you will need to construct different mappings. The general workflow for constructing a mapping is to:
- Identify the keys or fields from the data provided by the source system. Consult with the source system's documentation for a guide or data dictionary if you need more information.
- Identify the matching columns from the Power Pick system. The API and Report references are good guides to values in the corresponding Power Pick records.
- Enter your mapping into Data Pull.
- Test your mapping with sample JSON.
In order for Data Pull to create an order or material, all required values must be in your mappings. For Data Pull to delete an order or material, you must provide enough information to identify the orders and materials that will be deleted.
Create a mapping
After clicking on the Mapping tab, you’ll see the following:

The main region shows you the existing mappings created for this integration. A basic mapping will typically include the key (from your external system) and the column that it's mapped to in Power Pick’s database.
To add a new mapping, navigate to the bottom of the page. Select the Mapping Type, provide any keys, columns, or values for the mapping, and Save.

Typically, programs that read JSON don’t expect the keys to come in a specific order. For basic mappings, you don’t need to worry if the order corresponds with the JSON body from your ERP, or the corresponding JSON object for Power Pick.
Data Pull supports the following mapping types:
| Type | Definition | Mapped to a Power Pick Column |
|---|---|---|
| Column | This type of mapping pairs a key from your source system to a column in Power Pick. | Yes |
| Advanced | And advanced mapping allows you to build complex values from strings and columns in your source data. You can use this to specify a static string value, or create a string by concatenating values associated with keys. | Yes |
| Internal ID | This mapping type can designate a key/value pair from your source system as an internal identifier for the order. This can be part of a confirmation to your source system. | No |
| Text | This type of mapping pairs a key from the mapping to a static text value, without pairing it to a column in Power Pick. This value is available in logs and confirmations. | No |
| Grouping | This type of mapping indicates a nested JSON object. | No |
| Orders | Use this type of mapping to indicate that the JSON structure provided by the external system is an array of orders. Data Pull will create an order for each object in the array. | No |
| Order Lines | Use this type of mapping to indicate that the JSON structure provided by the external system is an array of order lines. Data Pull will create an order line for each object in the array. Note: This should be nested beneath an order mapping. | No |
| Materials | This type of mapping indicates that the JSON structure provided by the external system is an array of materials. Data Pull will create a new material for each object in the array. | No |
Hierarchical structures
While the order of your mapping doesn’t matter for most cases, there is one case where the mapping interface expects a particular order. JSON supports data that has a hierarchical structure: a JSON object can include other JSON objects or arrays as values.
Here’s an example of a JSON object with a nested hierarchy, where request_details is a nested object, and items is an array of JSON objects:
{
    "request_id": "12345",
    "request_details":
        {
        "request_name": "Parts Request for Customer A",
        "request_direction": "OUT",
        "request_due_date": "2024-04-22T19:11:45",
        "request_description": "Source Order Description"
        },
    "items": [
        {
        "item_name": "Part A",
        "item_quantity": "5",
        "item_lot": "114",
        "item_description": "Part A is used in conjunction with Widget B"
        },
        {
        "item_name": "Widget B",
        "item_quantity": "5",
        "item_lot": "114",
        "item_description": "Widget Bs support Part A in the general assembly"
        }
    ]
}
In particular, if you add a grouping, order, or order line mapping, Data Pull will expect that there is a hierarchical structure. To indicate that Data Pull should expect this nested structure, you should:
- Create a mapping for the parent object. For example, if you select Grouping from the drop down, indicate the key for the object, and Save.
- Add the nested mapping by selecting the type, specifying any keys, columns, or values, and Save.
- The mapping will appear in your table of mappings. Since this is from an object lower in the hierarchy, click and drag the object beneath the parent object, then drag it slightly to the right. It should appear indented beneath the parent object.
Any mapping indented to the right beneath another mapping is for a child object in the hierarchical JSON structure.

Advanced mappings
The Advanced mapping type allows you to manually enter strings and perform concatenation operations using multiple keys. For example, you might want to add a prefix to order names created by this integration along with the key (DataPull - 53901):
- Select Advanced as the mapping type The input fields will look similar to a column mapping (Key and Column).
- Select the column you would like to map the advanced value onto.
- To add the integration name as a prefix, type the following into the key textbox: "DataPull - " and press enter. This will appear similar to a key, but the double quotes will indicate that this is a string. The textbox will allow you to enter additional strings or keys as needed.
- Specify the ID/order name from your ERP as a key, for example,
orderID. - Save.

You can also use the advanced mapping option to enter a fixed value for all records created by your integration.
If you’d like to manually set a column in Power Pick to a string, select Advanced as the mapping type, type your text in double-quotes, "[text]“, and press enter. Then select the column from Power Pick, then Save. For example, you could do this to include a message for the Info2 field that this order was created by this integration:

You can remove strings or keys from an Advanced mapping with the x icon beside the value in the Key textbox.
Text mappings
A text mapping is a peculiar case: you may want to store a value associated with a key as part of the API call, and store that in ItemPath’s logs or return it as a confirmation to the source system. Like other mappings, select Text from the dropdown menu and specify the key from the source system. Then enter a value for that key and Save. When the integration runs, this will be part of the call and available in Data Pull’s logs and so yo u can refer to it with confirmations.
Example
Suppose you are working with an ERP system where you can request a filtered list of requests via its API. When testing with your ERP system, you’re able to get a sample list of outbound requests (where "request_direction": "OUT") with medium priority through a combination of filters. Typically, this request corresponds to an address, or URL, which you’ll be able to enter in your Data Pull integration as you manage its settings. When you create the integration, make sure to specify that all orders created by this integration should be "Picks" this corresponds to items leaving your warehouse.
Here's a sample of the data you might receive:
{
    "requests":[
        {
        "request_id": "12345",
        "request_details":
            {
            "request_name": "Parts Request for Customer A",
            "request_direction": "OUT",
            "request_due_date": "2024-04-22",
            "request_description": "Source Order Description"
            },
        "items": [
            {
            "item_name": "0000630425",
            "item_quantity": "5",
            "item_lot": "114",
            "item_description": "Part A is used in conjunction with Widget B"
            },
            {
            "item_name": "0000630425",
            "item_quantity": "5",
            "item_lot": "114",
            "item_description": "Widget Bs support Part A in the general assembly"
            }
        ]
        },
        {
        "request_id": "12345",
        "request_details":
            {
            "request_name": "Restock for DC 8129",
            "request_direction": "OUT",
            "request_due_date": "2024-04-22T19:11:45",
            "request_description": "Source Order Description"
            },
        "items": [
            {
            "item_name": "0000630425",
            "item_quantity": "5",
            "item_lot": "114",
            "item_description": "Source Item Description"
            }
            ]
        }
    ]
}
As you review the body of the response, make some basic notes for planning your mapping. Here are some important properties you should note:
- The body of the response is an array of request objects. They consist of an ID, a request details object, and a list of items that comprise the order.
- The request stores key information as a nested object.
- Items play a similar role to order lines.
Start by looking at ItemPath’s API reference materials for Create Order requests and comparing that to the fields with your source data. As you go, create a table or spreadsheet that includes all required fields and add any additional fields you would like to have completed in Power Pick.
You might even create a hypothetical JSON object for your order:
{
    "name": "Example Order Name",
    "directionType": "1",
    "order_lines": [
        {
            "materialName": "0000630425",
            "quantity": 5,
            "lot": "114",
            "Info1": "Order line description"
        }
    ],
    "deadline": "2024-04-22T19:11:45.590000",
    "Info1": "Order description"
}
The resulting table would look like this:
| Power Pick Field | Data Type | Mapping Type | Source Key | Data Type | Notes |
|---|---|---|---|---|---|
| n/a | Array | Orders | requests | Array | Add this to indicate that the JSON body retrieved from your ERP is an array identified by the requests key. |
name | String | Column | request_id | String | By mapping the ID to the name, order names in Power Pick will correspond to the ID of the order in your ERP. |
| n/a | n/a | Grouping | request_details | Object | You will need to tell Data Pull that request_details is an object so it can retrieve fields from within the object. |
directionType | Number | n/a | n/a | n/a | Since you've filtered the response for the ERP, and all orders are “OUT”, this can be set as a global value for the integration. |
order_lines | Array | Order Lines | items | Array | The items array is a list of individual items that comprise the request, which is functionally similar to the order lines array in Power Pick. |
materialName | String | Column | item_name | String | Ideally, the item name is the same in both systems. If not, during your Power Pick configuration, you might have mapped stock keeping unit codes (SKUs) from your ERP to the material’s ID or code fields, which you can use instead. |
quantity | Number | Column | item_quantity | Number | This is a straightforward value map. |
lot | Number | Column | item_lot | Number | It might be the case that you track specific lots of materials. This is a column mapping. |
Order Lines > Info1 | String | Column | item_description | String | It can be valuable to bring notes or descriptions into Power Pick as well. This is also a column mapping. |
deadline | Date and time | Column | request_due_date | Date and time | Date and time values can be mapped using the column type. |
Info1 | String | Column | request_description | String | As with the item description, it can be valuable to bring descriptions or notes into Power Pick using info fields. |
This might feel a little intimidating, but this table becomes a solid guide to constructing your mapping. Here’s how you can complete the mapping for your integration, step by step:
- Select the Order mapping type. This tells ItemPath to parse the body of the response as an array of orders.
- Map
request_idto the name value:- Select Column and enter
request_idinto the Key textbox - Select Order > Name from the column dropdown menu.
- Save your mapping.
- Select Column and enter
- Map values from the request_details object:
- Select Grouping from the dropdown menu.
- Enter
request_detailsas the key. - Save.
- For each of the values from the request_details object that can be mapped using the Column type, repeat step 2 with new values (
request_due_dateto Order > Deadline,request_descriptionto Order > Info1), with each value indented to the right beneathrequest_details.
- The next row in the planning table is for the array mapping for items to order lines. Select Order Lines from the drop down, and enter
itemsas a key. - Each of the values from the
itemsarray can be mapped with a column mapping, as in step 2. Repeat step 2 for each pairing detailed in the table that maps a key to an order line value. To indicate that these are keys from objects in the order lines array, you will need to drag the added row to the right beneath the items mapping.
Best practices for mappings
Creating mappings between your systems can be the most labour intensive part of building integrations. It involves careful planning to drive outcomes in Power Pick and you’ll need to understand how to relate your source system to Power Pick. Here are some best practices and tips to help you with your integration project.
Recommended values
When planning your integration, you can figure out what data you need when creating records by checking with the API documentation. Starting with all required columns is good, but you should review the recommended values to build a list of what data you would like to include on your orders and materials.
For easy reference, you should use the following pages from the API docs:
For orders, you should consider including the following fields/columns:
- Name (required)
- Direction Type
- Order Lines:
- Material Name/ID/Code (you must include at least one of these three fields)
- Quantity (required)
- Lot
- Info1: Typically text describing the order line
- Priority
- Deadline
- Info1: Typically text describing the Order
For materials you should consider including the following columns:
- Name: The name of the material (required).
- Codes: An array of codes associated with the material, for example, part lookup numbers.
- Info1: Often a description of the part.
- Info2: Often any notes about this material
- Unit of Measure: Unit used by this material.
- Material Property Id: A material property is a record in Power Pick that functions as a rule governing how a material is treated in orders or other interactions with the Power Pick system.
Retrieving and managing data
The exact details of getting information from your systems for constructing mappings varies from system to system. Use curl or a similar tool to get a sample response body, which you can then use to test your integration. You should also consult with the documentation for that system, identifying what resources are available are an important part of carrying out an integration.
When you’ve retrieved a sample, it might be a single line of condensed JSON. You can use tools such as VS Code with the Prettify JSON extension to automatically convert the JSON from a single line to a format easier to read.
Here’s a simple example of a JSON body as a single line:
{ "request_id": "12345", "request_direction": "OUT"}
With Prettify JSON, you can use your command palette (ctrl-shift-P > Prettify JSON) to enhance the readability of your data. The result will be:
{
	"request_id": "12345",
	"request_direction": "OUT"
}
VS Code can also tell you if there is an error in your JSON sample that renders it invalid. If there is an error, Data Pull won’t be able to parse the information if you use the sample JSON in a test.
Troubleshooting
Data Pull checks to see if you have entered required values for each mapping type, and you can only save a mapping once you have made the required selections. You can update or remove existing mappings, but be sure to Save.
Your mappings are an important part of your integration. Ensure that you have entered the keys as they appear in the response from your system. However, Data Pull doesn't actively check against your external service while you are constructing mappings.
It’s important to test your connections. If you have saved a sample piece of JSON, you can use the Test tab to conduct a manual test, without sending a request to an external service. Select the Test tab, then toggle the test to use sample JSON. Paste your sample into the textbox, and select Test. If Data Pull successfully interprets the JSON, you will see a success message. For help with particular error messages, see Integration Tasks & Tests.
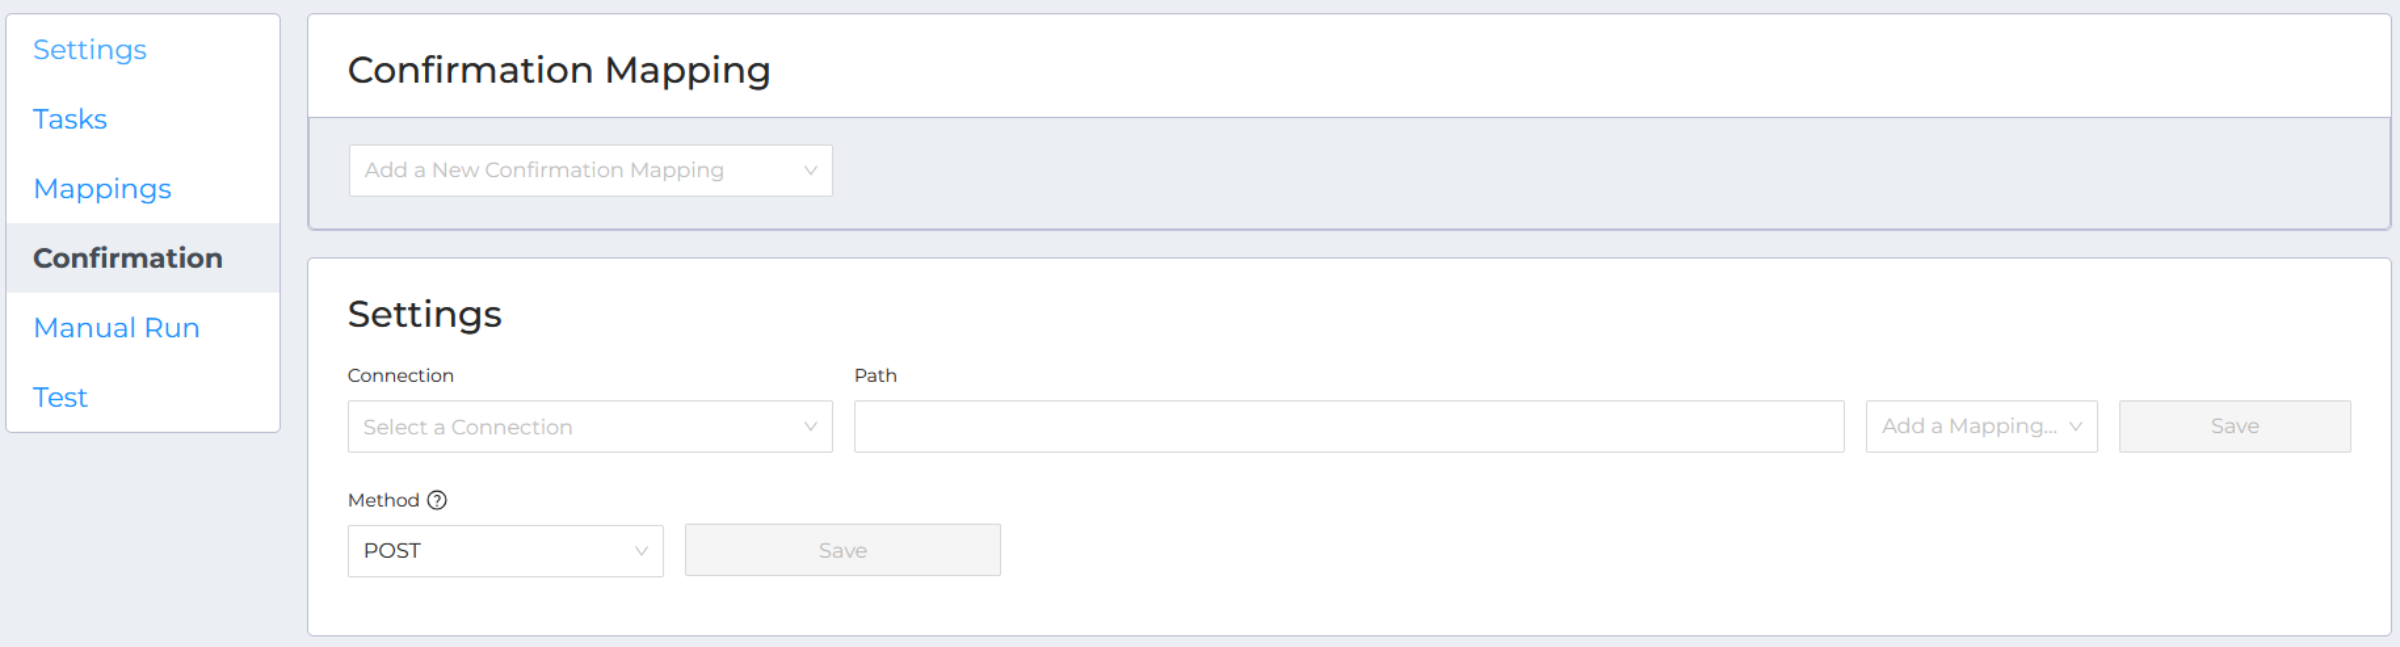
Confirmations
When a material or order import is complete, Data Pull can also send a confirmation message back to the system. This is also customizable, but we recommend including the status code and message, which will indicate if the import was successful or if there were errors.
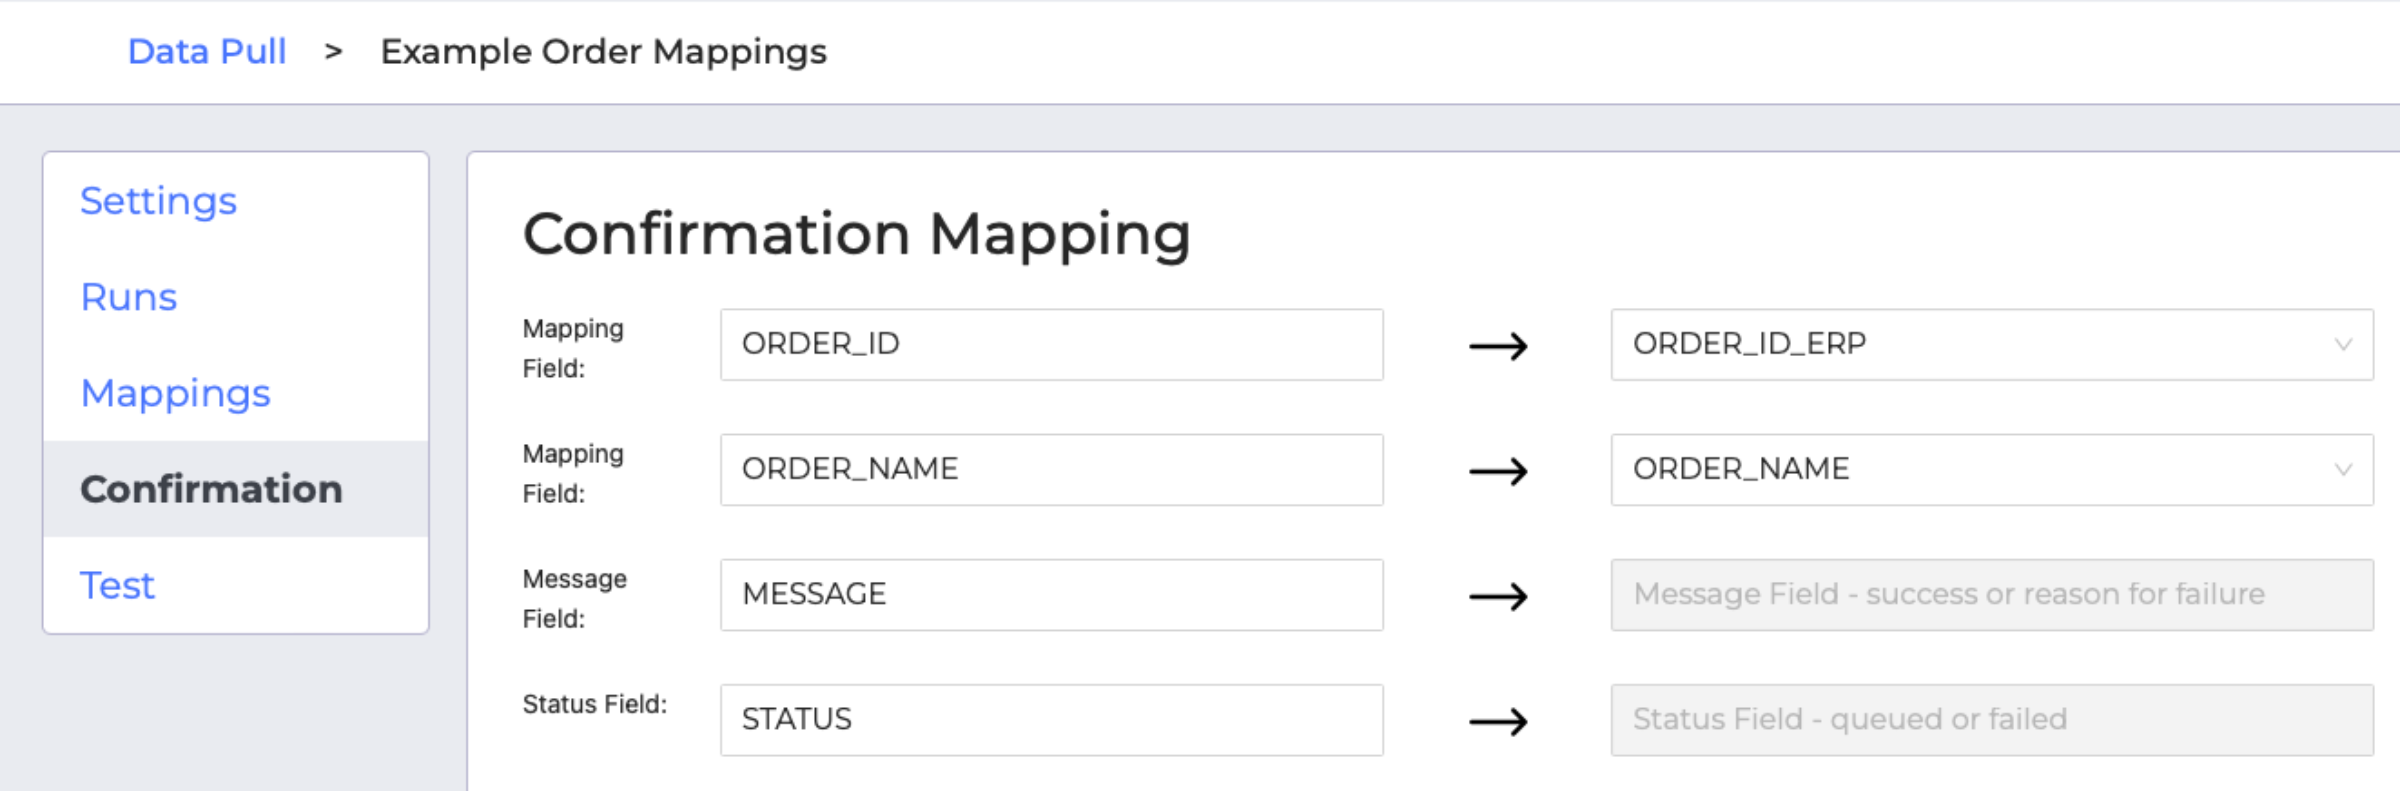
Use the "Add a New Confirmation Mapping" dropdown to select a value to map back to your ERP system. After specifying the key and any necessary values, you can save to add them to your mapping. The following types of mappings are available:
- Text: Map a static text value to return to your
- Status: Data Pull will receive a status and message from Power Pick's API, this can either be a success or an error. You can specify text to be supplied in either case.
- Message: Data Pull receives a message along with the status. You can pass this message to your ERP system.
- Grouping: Use this to indicate any grouped values in the JSON body that your system might expect. Drag and drop to rearrange mapping fields. A field is within a grouping if it is indented to the right.
- Mapping: Use this to map any received values back to your ERP system. You can select the name of the received value from a dropdown list.
Here’s what your Data Pull confirmation might look like if you use them to mark orders as imported:
{
    "ORDER_NAME": "Example Put Order",
    "ORDER_ID": "CC12C8F7",
    "STATUS": "200",
    "MESSAGE": "Order imported successfully"
}
After building the mapping, specify the connection details for the system you are sending confirmations to:
- Select your connection. This may or may not be the same connection that you used for the integration as a whole.
- Specify the path to the endpoint that will receive confirmations.
- Select the HTTP method to use for making the call (
POSTorPATCH). - Add any mappings to the connection (optional, if you need to modify the path base on a value from the integration).
- Save your connection details.